


Site Directory
Features
Home
Unique Mods:
- Stealth
V1 Install
- E36
M3 Shifter
- LED
Interior Lights
- Cold
Air Intake
- $2.99
Heat Shield
-
Rear Decal Mount
- Shadowline
Install
- Armrest
Swap
- Clutch
Stop
- Trunk
Handle
- V.60
Phone
All
Mods
"They
all do that..."
(Problems/Fixes)
"RTFM"
(Reference Materials)
Visit
the New BMW
Owner's Self Service Center
Cool
Tools
Pictures
Links
Contact
me at:
mike@540i6.com
New!
Bentley 5 Series
Service Manuals!

Search ebay:
![]()
![]()
![]()
AutoSharp Pens
Stealth Install of a Valentine One Radar Detector in a BMW E39 5 Series
Note: The newest V1 is about 1/4" more thin and permits a more "stealthy" install. In the E39, it fits in the same location with no cutting of the panel required. I'm leaving the old instructions up since some other cars still require additional clearance to fit.
This page describes a "stealth" install of a Valentine One (V1) radar detector in my 97 BMW E39 540i 6-speed. The same basic approach can be adapted to other BMWs that have the same type of sunroof access panel and detectors other than the V1.
Why?
Because radar detectors are banned here.
As side benefits, since the detector isn't as visible I don't have to worry about removing or hiding it when leaving the car, and I don't have people lining up behind me on the highway when they see the detector.
This really isn't worth doing for most people, but I've had enough questions about it that I made this page. And, yes, I'm sure that there is some reduction in range when the detector is mounted this way (see "How's it work" below). The main benefits of this location are that the unit is accessible, it's an easy and cheap install, and it doesn't require irreversible mods to the car.
References
See the following sites for more detailed info regarding the V1, hard-wired installation, and some other installation ideas.
Valentine One radar detector:
Valentine Research, Inc. web site.
Peter Glaskowsky has put together a great set of instructions for hard-wiring the V1 unit with lots of detail and pics. Refer to Peter's page for instructions regarding how to wire the main unit and the concealed display:
V1 Hard-wire Instructions.For absolutely the most clean and "stealthy" install, take a look at the new "StealthOne" integration with the BMW instrument displays. Just plain too damn cool. Doesn't get any better.
More install ideas:
Links to more install ideas for BMW and other vehicles.If you know of others, send me a link and/or pics and I'll post them here.
Main Unit
The main unit is consealed above the sunroof access panel as shown below.
Panel in place - side view.The unit is hard-wired basically along the same lines as described in Peter's write-up.
The V1 main unit is about 1/4" too thick to allow the cover to properly seat with the unit under it, so I had to provide additional clearance by cutting away the area marked in the picture below. A Dremel tool and cutting wheel (and a very light touch) makes this relatively easy to do. The plastic is fairly soft and the wheel makes quick work of it - too quick if you aren't careful. It will also make quick work of your fingers (insert obligatory "I'm not responsible, blah, blah, blah..."). The most difficult part is cutting through the plastic panel without also slicing through the fabric covering. There's a little grace since the fabric has a thin layer of foam padding under it. Just need to go slow and not use too much pressure as the cuts are made.
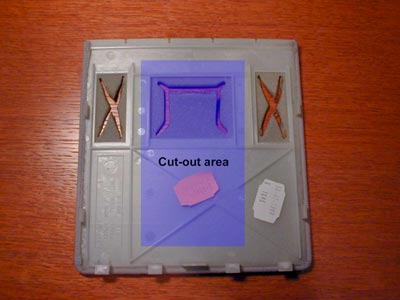
Stock Access panel cover and area to be cut away.The panel shown above is BMW part number 51 44 8 206 531. This one has the cut-out for the UGDO panel. The panel without the cut-out is part number 51 44 8 206 529. Both are about $10 discounted from a dealer. It really doesn't matter which is used - the center area is removed anyway. Obviously, the part numbers vary depending on the vehicle and color.
After making the cuts, I used a razor blade under the edge of the plastic and between the thin foam backing to remove the plastic from the fabric. Need to be delicate when doing this. If too much of the foam backing is pulled away, it won't look smooth when the panel is in place.Once the center area of the panel was removed, I placed a thin piece of foam over the cut-out as shown below. This isn't necessary, but it makes the final appearance more smooth when the unit and panel are in place. A little spray adhesive (too much will stain the headliner material) helps keep it in place.
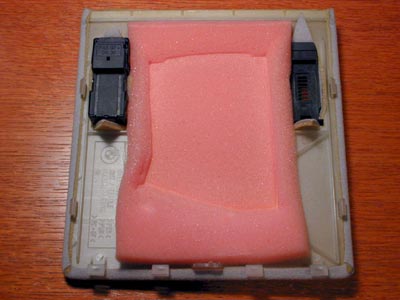
Foam padding in place.It wasn't necessary in this case, but additional strips of foam could be used above and below the unit to "aim" it top-to-bottom.

Main unit in place.The main unit is positioned in the cut-out and the panel and unit are replaced. It's a press fit, and the pressure of the panel and the foam holds everything in place.
The final install isn't particularly noticeable if you aren't really looking for it.
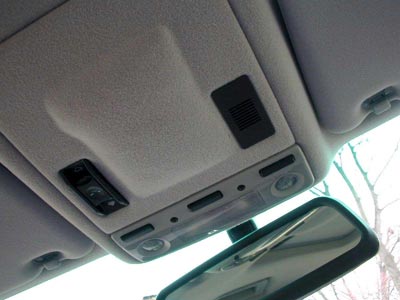
Panel in place - bottom view.If I could find a way to fit the unit under the panel without the cut-out, then none of the above would be required; however, it doesn't fit in my 97 540, or in my 95 E36 M3 or a 91 E34 that I've owned in the past where I've done similar installs (at least without altering other components under the sunroof access panel).
I've considered mounting it up under the headliner, but then it wouldn't be as easily accessible. Another idea that I'm considering is to see if the unit will fit without cutting the panel if it's positioned a little forward of where it sits now, and cutting away the center portion of the overhead light. This probably would give better results as far is performance is concerned since the mirror wouldn't block the forward view of the detector as much. I've not yet tried it, so I can't say.
Remote Display
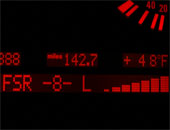
There are lots of options for mounting the remote display (see links). I've mounted mine in the switch panel above the cup holders as show below.
Remote display mounted in switch panel.Mine is the older model without the control knob. For units with the knob, I think the ashtray mounting is the nicest that I've seen. Also very nice are the remote units mounted in the rearview miror.
I had to get a different blank to replace the remaining unused areas in the switch panel. These come in four lengths, depending on how many blanks you need to fill. The part number for the blank switch covers are 51-16-8-161-567 (single), 51-16-8-161-568 (double), and 51-16-8-161-566 (three-blank). They just snap straight in and out.
The blank where the remote is located is covered with a thin piece of dark orange acetate film, backed with a thin piece of more rigid plastic film. This matches the appearance of the other display panels and makes it look almost stock (moreso than it looks in the pic because of the way the light reflected).
An on-off switch is installed in the panel next to the unit as shown below. The switch is made from a gutted used ASC switch (part number 61-31-8-363-694, $50 new!) and a small spring-loaded SPST switch. Trust me, you don't want to do this! lol. What a pain in the ass.
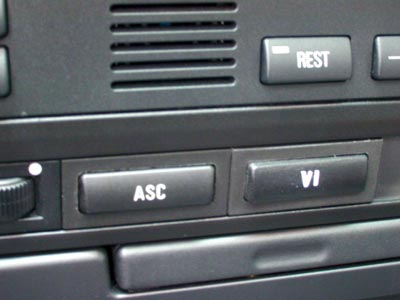
Remote power switch.Rub-off lettering was used to label the switch, with a light coat of spray-on varnish to keep it from rubbing off. Unfortunately, the lettering is very hard to come by these days, and I couldn’t find a font and size to match exactly the lettering of the other switches. It's pretty close though. I was tired of screwing with it, so the switch does not light up (yet anyway).
Again, you really don’t want to do this - I would have been happy with a simple on-off switch that matched other panel switches, but as far as I know there isn't a stock switch that you can get that isn't a momentary contact switch and I didn't want to screw with building in a circuit to make it work. In hindsight, that probably would have been easier.
How's it work?
Update 11/30/2001: I still had my old V1 after I got the new version, and I had an opportunity to do a side-by-side test with the old unit mounted in an optimal location high in the center of the windshield and the new unit mounted as described above. Any differences in detection were minimal... maybe one or two seconds at highway speeds. I'd guess that better circuitry in the new version probably evens things out some. The new version also sits up a little higher, clearing the mirror better. Again, note that my experience applies only to the area where I drive, which involves mostly short distances and lots of traffic to reflect signals. At the fringes of the range of the detector, you'd probably see more of a difference.
I'm sure that I lose some range versus having the unit installed in a more optimal location; however, in practical use, any reduction to the maximum range of the detector really doesn't matter much with the distances that I encounter radar here and the amount of traffic and other types of reflectors providing bounced signals. Actually, it works suprizingly well versus what I'd expected given the placement of the mirror in the E39.
The main factor affecting reception isn't having the unit mounted up high under the cover - there's not much metal in the area in front of it - it's the mount for the rearview mirror. I have the unit positioned so that it peeks out just above the mirror, with the front antenna positioned to the side of the mount. Still, I'm sure that it limits the forward view somewhat.
In any case, I've had the unit mounted like this in several different BMW cars for 5+ years and I've always had plenty of time to react to any signals detected (*knock on wood*). I'd guesstimate that it might reduce reception up to maybe 20%, but I have no real basis for that number. Even with any reduction, I still pick up signals long before I'm within range to be tagged. The amount of warning distance varies depending on the area. As always, YMMV, particularly if you're in an area where you may be subject to radar at extremely long ranges.
Obviously, laser detection front and rear is not functional, but my feeling is that it's of limited usefulness anyway.
The unit is easily removed when I want to move it, and it's accessible for adjustment of the volume and other controls. Also, the cut-out panel is easy and cheap to replace with another stock panel when the time comes.


|
|
|
|
Copyright
© 2002 by M. Andrews. All Rights Reserved.
The information presented on this site describes modifications that
I have made to my car.
Should you choose to attempt any similar modifications, you do so at
your own risk.
This site is not affiliated in any way with BMW NA or BMW AG.
All trademarks, servicemarks, and copyrighted materials that may appear
on this site
are the property of their respective owners.